If you’re like me you get the typical question from beginners and intermediate students, “What do I do with these things?” as they hold their poles awkwardly. Entry level and even seasoned instructors might tend to answer with “You plant your pole, then turn around it” or “They’re used for timing and balance” or “The pole swing draws you into the turn.” These answers are sometimes followed by a series of leading nods of reassurance by the instructor.
The first answer, if acted upon throughout your skiing career is “cause for concern.” The second answer is true but requires a full explanation, not just the instructor’s confident tone and encouraging nodding to impart the true meaning. And the third answer, while I admit is true, many instructors do not completely understand the mechanics of the statement or how to implement its meaning.
The next time you are faced with this question, or secretly ask the question to yourself (it’s OK, I ask myself these questions all the time), here’s the inside scoop. Recall Kate Morrell’s popular alpine tip “Get a Grip to Rip” in the Winter 2009 Issue of the NW Snowsports Instructor; her emphasis was on holding the pole firmly on the grip.
I have three truths in pole use that build upon and help clarify things:
- The pole tip touches the snow surface in a specific area called “the touch zone.”
- The pole tip remains approximately the same distance off the snow surface during the swing.
- The pole grip is always moving and ahead of the pole tip at all times during the swing and touch.
Now if you are paying close attention to these truths about pole use I am professing you might already find some holes depending on turn shape, breaking versus gliding, deep powder or bumps. Indeed I agree, however if you apply these truths on groomed snow during a series of gliding turns where speed control is maintained by turn shape, these “truths” would stand up to Perry Mason’s scrutiny.

Truth #1 : The pole tip touches the snow in a specific area called “the touch zone.”
The pole tip touches the snow in a very specific area called the “touch zone” which depends on your intended turn outcome like a medium radius, gliding short radius or breaking turn. But where is this precise area? Let’s define it.
While standing in your skis on the snow on flat terrain, visually approximate the distance from the toe of your ski boot to the tip of you ski. Now, from the toe of your ski boot, draw a line perpendicular to the ski this same distance – let’s call this Length A (See figure A). Next scribe an arc from the ski tip to this perpendicular line with an equal radius to Length A. If you were to continue this arc you would scribe a complete circle. Next bisect this quarter circle into 2 equal parts: the green area in Figure A is The Touch Zone; The red area is The No Touch Zone.
Now that we have some precise zones defined with some appropriate names, let’s start using them. In medium and short radius turns the pole touch occurs in the touch zone. In medium and long radius turn the pole touch happens in the no touch zone. Wait a second, the name of this zone is “the no touch zone” so if you think you might want to touch the pole in the no touch zone, don’t do it. Swinging the pole into the “no touch zone” is OK, but only if you swing your pole as described in Truth #3. In medium to long radius turns, the pole swing is still very important as it facilitates movement into the future, however the pole touch in these turn sizes can potentially disrupt flow, so it’s optional.
In medium radius turns, constrained to the 1-1/2 to 3 packer widths (as described in the PSIA-NW Certification Guide), the pole touch would ideally occur in the touch zone, but closer to the boundary with the no touch zone. In gliding short radius turns, 3/4 to 1 packer widths the pole touch would typically occur more in the middle of the touch zone while in short braking turns, in 1/2 to 3/4 packer widths, the pole touch would occur furthest from the no touch zone boundary.
There will be variations in the distance away from the skis’ edges while staying within the touch zone depending on the steepness of the terrain and the type of turn being made.
Truth #2 : The pole tip remains approximately the same distance off the snow surface during the swing.
Now that you know where to touch the pole, getting there is the next step. Maintain a consistent distance of the pole tip off the snow surface during the swing as you target the touch zone. If the relationship of the pole tip to the snow surface varies greatly during the swing, this could be a visual indicator of a variety of causes like whole-body inclination late in the turn or there is an involuntary upper body rotation caused by the pole touch target and the mechanics of the arm and upper body with respect to the pole swing itself.
Maintaining a consistent relationship of the pole tip to the snow surface during the swing will require the CM to move in the intended direction of travel earlier in the turn, facilitating both progressive de-edging and de-angulation movements. However, in order to achieve these effective movements, you also have to employ Truth #3.
Truth #3 : The pole grip is always moving and ahead of the pole tip at all times during the swing and touch.
OK, in reality the tip can, and sometimes does, pass the grip in a gliding turn, but this should only be a slight amount and is relative to the line of action. It sounds better to say “at all times” so the statement sounds strong and emphatic.
For an effective pole swing to facilitate movement of your CM in the intended direction of travel requires just that: movement of the CM. As Kate mentioned, swinging the pole tip out in front or down the hill may or may not help movement. However, if you grip the pole firmly and keep the pole grip ahead of the tip as you swing, while targeting the touch zone you will feel your CM moving. The key to success in Truth #3 is to focus on constant and continuous movement of both pole grips and tips.
Side note: In a braking turn the pole plant is intended to help stabilize the CM, so the tip can and typically does come forward of the grip, then the grip passes the tip as the edges are released and the CM moves into the turn.

Visual Cues and The Touch Zone
Referring to my Visual Cues to Effective Skiing Pocket Guide and/or the PSIA-NW Certification Guide there are three cues that jump right out:
- The inside hand, shoulder and hip lead the turn, resulting in a countered relationship
- Hands are in front of the body to aid in balance
- Pole swings smoothly in the intended direction of travel
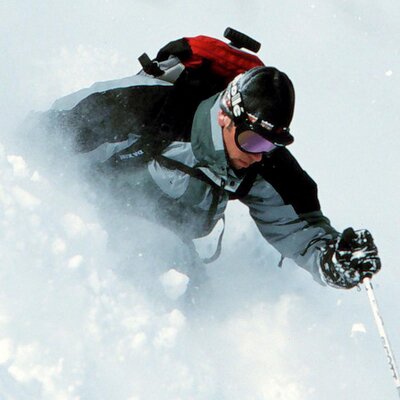
Let’s look a few skiers. In Example 1 you can see relative to the three truths the pole swing is targeting into the no touch zone, the pole tip is well ahead of the pole grip and the pole tip has likely been swung to its highest point and will be lowered to the snow to make the pole touch. Referencing the Visual Cues you will observe the outside half of the body is leading, and the inside elbow is back symptomatic of undesirable upper body rotation with the CM “back and inside.”

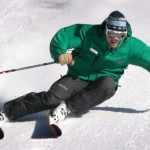
In Example 2 skier, the pole swing target is closer to ideal but the pole tip is well ahead of the pole grip with essentially no movement of the CM in the intended direction of travel at this moment.

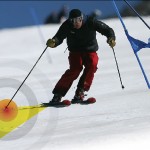
In Example 3, you can see that the pole grips are ahead of the tips, the pole swing will likely be in the touch zone, and the inside half of the body is leading the outside with the hands and elbows ahead of the torso.
Stabilize the Torso, then Use Your Lower Body to Touch Your Pole
The key to successfully implementing “the truths” one must also stabilize the torso through muscular tension and awareness. Gripping the pole firmly while actively engaging muscles in the hand, fore arm and biceps, is a good start. Continue this muscle activation through the upper torso connecting both arms across the pectoral muscles in your upper chest, and the Erector Spinae muscle group, which is on either side of your spine in your upper back. Without this muscle chain activated the tendency is to see the pole swing isolated to the arm and/or promotes upper body rotation. When these muscles are activated you will feel a bit “stiff” at first, but just like novice skiers feel tense on day-one, you will begin to understand how much muscle tension is functional the more you activate these muscles.
The ability to swing the pole into the touch zone, while implementing truths 2 & 3, requires movement of the lower body to reach the touch zone. You must combine ankle dorsiflexion, knee extension with complementary hip extension, or flexion, dependent on desired turn outcomes, as to allow your torso (and CM) to move forward, so in turn, you can touch the pole in the touch zone. Yes, that’s right! You use coordinated movements of the ankles, knees and hip joints to touch your pole, not your arms! Who would have thought?
Timing of the coordinated movements to maintain “the truths” is also critical, which I have specifically excluded. If you implement these truths while linking turns, the timing nearly takes care of itself, primarily because the pole swing and touch are an integral part of linking turns, not just the punctuation of a single turn.
Successfully implementing the truths requires concentration, practice and discipline. These are old concepts, heard time and time again, packaged a little differently in the Touch Zone. And remember if it doesn’t feel weird you’re not doing it! For more information also check out ”Look to the Poles for a Change of Direction” in the Winter 2006 Issue of The Professional Skier by Harvey and Fry to further anchor some of these concepts.